Being a special month for me, I took a week off work. It's my first real extended break from work since the end-of-year batch of statutory holidays.
Over this time, I did all sorts of things, like get my provisional drivers license. In addition to that, I promised myself that I would build at least 5 of the robot model kits I've been collecting. Frankly I've got a lot of them now that are just waiting to be built. 21 or so off the top of my head. I've been holding off on them for various reasons. Probably weariness caused by work. However, I managed my quote. I said five, and I built six. Five of them were Zaku's, one was a GM. The GM is complete as far as construction is concerned, but there's custom paintwork I've got planned for it.
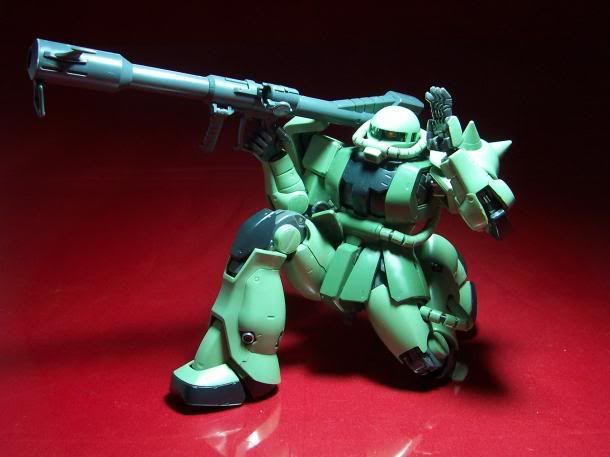
Of Zakus, there were two different Zaku II v2.0's, a 1/100 Zaku II F2, a 1/144 Zaku II F2 (EFF) and a 1/144 Zaku I Sniper. For some photos of them, they can currently be seen on my Photobucket account. That link will take you directly to them, along with a few other items I've purchased in June 2010.
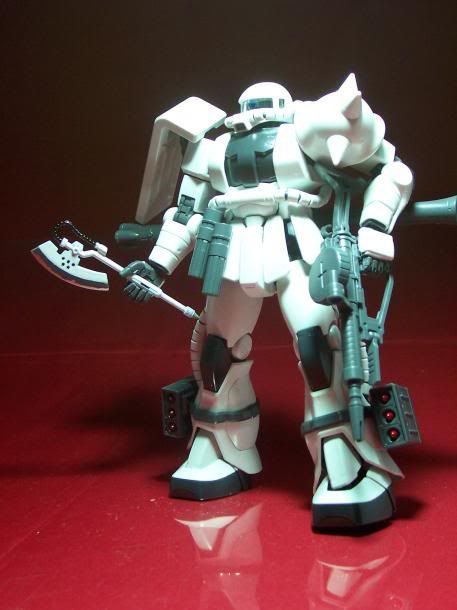
The one I want to show off is the third addition to the White Ogre platoon I've slowly built up. This time, White Ogre #3 will be called - using completely original and not deliberately descriptive nomenclature: Air Ogre (w/ crystal eye)
Made up from parts of a Zaku II MS06-R1 "Shin Matsunaga Custom" and a MS-06 J "White Ogre" custom to make it look like a White Ogre with all the necessary flying parts, as well as the customized skirting, elbow armour, shield with extra joists, detailed spiked shoulder armour and a right shoulder with vents. Also the prototype Zaku Bazooka that looks partway between a Zaku Bazooka and a Big Bazooka.
Note, I've not used any of the markings for the White Ogre on any of the kits so far as I don't want to relate these White Ogres to the proper "White Ogre" custom used by Elmer Snell from the MS Igloo 2 series.
The reference to a crystal eye just means that I've not painted the mono-eye camera in its head. I've always painted them with clear colours like red, blue, green, orange, etc. However, this is the first time I've built a Zaku 2.0 kit without painting the eye, and it looks quite nice for a change. You could say I was just being lazy, but I wanted to use an eye colour that I hadn't used before as I've gone through the entire range of Tamiya clear colours so far - with the exception of clear and smoke.Clear would be redundant, and smoke would just make it darker. (I did use a clever combination of pink food colouring and Klear floor wax (that's Future to those in the US) for the Zaku II F2 to get pink).
I also spent a bit of time detailing the randsel jet pack as well as the vernier bell thrusters on the legs with chrome silver and metallic red marker pens.
I usually only use chrome silver to paint the inside of the bell as well as dab the edges of the thrusters to make it look like the darker paint peeling away from the inner-metal surfaces. I like small shiny and metallic details like this in small quantities. This time though, I decided to do something different. Gundam models often have the inside of the thrusters in red (or in some cases yellow such as on the Kampher). I don't find myself particularly fond of that, so I went with a compromise. I've used a red ring around the edges. Not entirely sure of the significance of it, but it has resulted in a nice effect. I particularly like the effect it has had on the legs:
It's a pity though that you're not generally inclined to look at the feet or anywhere that far down when viewing a completed model kit that is on display, so you lose out on these details unless it's on a display arm in a flying pose.
And here are the left over parts from the White Ogre and Shin Mastunaga Custom - enough to make another Zaku II MS06J. Has black pipes, gray chest sides, white knees and cockpit and gray soles. I may use this for a complete repaint job one of these days. The white knees, surprisingly enough, were surplus parts in the Shin Matsunaga custom set.
Note: This photo is not flipped horizontally. I deliberately swapped the positions of the spiked and shield shoulder guards - though I suppose it wouldn't matter either way.
That certainly looks like a lot of weapons (spare from the other 3 White Ogres that aren't being used) - but certainly as many as I could have it displayed with if had borrowed the weapons from my other Zakus. I did learn a cleverly new way to clip the bazooka and machine guns over the shoulders. Similar to how they are stored in the Target in Sight PS3 game. Done by simply popping the arm off and slipping the handle on the shoulder joint, and putting the arm back on. That's given me two more places to clip weapons in addition to the weapon mount ratch on the back armour skirting.
In my next article, I'll have a short natter about Transformers - since that consumes as much time, if not more, than general robot model kits! Not sure what I'll talk about at the moment, but I'll think of something. Might make a few mention or do quick review of the Powercore combiners that have recently been released, and my mixed reception of them.
Not a doomy gloomy blog. Just a blog of stuff - generally hobby related. Mainly stuff.
Showing posts with label Model Kits. Show all posts
Sunday, June 27, 2010
Monday, May 10, 2010
The new 1/144 Zaku II F2
I was poor on cash last month so didn't have much of a capacity to buy much for myself bar the essentials. However, it gave me a chance to work on some of the model kits I had been collecting but not building. This consisted of a bunch of Gundam kits involving various High Grade 1/144 GM's. GM's are the mass-produced Gundam units used by Earth Federation Forces/Space Forces, and function solely for the Zeon army to destroy by the handful. Basically it's the EFF/EFSF version of the Zaku II in function. But that's just a bit of useless information.
In addition to the GM's, I was especially excited to try Bandai's brand new 1/144 Zaku II F2 kit, which is the Zaku variation that appeared in the 0083 Stardust Memory series. Not to be confused with the good old Master Grade 1/100 model. This new kit is fairly recent and was released about a month or two ago of this posting. There are two releases of this, the Zeon and the EFF version. Built here is the green Zeon version. I haven't had much of a chance to construct the other, but is otherwise identical bar a tan paint scheme.
The MS-06F2 appears to be a rather a heavily armoured variant of Zaku II MS-06F, with heavier plates on the arms, chest and loops to secure the piping around the waist. Though lacking in double jointed elbows, which seems to be the standard in the more recent model kits (like the Gundams and the Zaku I circa 2006 and onwards), this model is a vast improvement over the previous High Grade Zaku II offering. In fact, I dare say it's almost tries to mimic the shoulder and hip articulation found on the Master Grade v2.0 Zaku's, particularly with the shoulder and hip assemblies.
The head is a bit smaller than in the previous 1/144 Zaku II, the proportions look a whole lot better, and almost matches its 1/100 v2.0 counterparts. There are actually three helmet variants available during assembly. The standard (as above), commander's antennae and one with three armoured plates along the forehead. The 1/100 Master Grade EFF Paintball version of this chap had these armour plates that you can glue onto the helmet.
The only thing that I find that is missing from this kit is the 280mm Zaku Bazooka, which is practically a standard fitting on most Zaku II model kits as is the obligatory 120mm Zaku machine gun. The 120mm Zaku Machinegun is present but with a different stock and under-barrel grenade launcher attachment. The Zaku Machingun even comes with the alternate ammo magazine used by the EFF Zaku's during Paintball practice. It is molded into the rifle, so you only need to remove the standard ammo drum to reveal it. Other accessories include theHeat Hawk (axe, and also the second obligatory weapon next to the Zaku machinegun) , a pair of triple tube rocket launchers that fit on the legs and a 90mm heavy machine gun as seen in the top picture.
The only real major complaint I have about this kit is the clip that holds the Heat Hawk to the armour skirting. Rather than the usual round peg and peghole setup, it's a rectangular recess that you have to fit a flat diagonal peg into. It doesn't like to stay in very well. An undocumented and probably unofficial use of the axe holder is to slot it between the 'open 'optional hand to make it look like the Zaku is handling the axe in a more casual manner.
Overall I must say that I do highly approve of this new Zaku, though it could use double jointed elbows and a better axe holder. Now I'm crossing my fingers in hope that they release the humble Zaku II in Bandai's new RG (Real Grade) series, which I am lead to believe is like cross between the level of detail or complexity of a Master-Grade scaled with the usual High Grade scale (1/144). First up in the RG line is the iconic RX-78 Gundam, which I may actually cave in and try out one of these days when it is finally released.
Sunday, May 2, 2010
Building Zaku II v2.0's the hard way
Sometimes I challenge myself and do some really hard things just for the heck of it. This might be partly due to the X-COM series, which some of you who know me, am a fan of. The first three games in the series are very harsh on beginners. So hard that many new players will often have to rely on save/reload to beat it. Nutters like myself, who want to make it harder, make occasional self-imposed challenges to just plain make it harder for the heck of it.
From time to time I appear to extended this idiosyncrasy (or perhaps a case of masochism?), just for the heck of it, on other aspects of my life. Mostly on other computer games. But now, I've attempted it with model kit building. For the first time ever, I've built two 1/100 Master Grade MS-06J Zaku II v2.0 model kits completely without once referring to the manuals.
Welcome MS-06F #2 and MS-06J "White Ogre" #2 (Blue Eye) to the family.
Note: The photo for the MS-06F may appear to be cut in half if viewed from the main Blog window. Just click on it to open the full image directly from my Photobucket account.
Now, I will admit that I have had practice in the past. At least 10 variants of these guys so far, so it's not as if I started blindly. Also their basic frames are the same and differ only in minor details. There are still hundreds of bits of pieces to put together and it's been months and months since the last build.
The one thing I found about this fun feat was that the entire build process was so much faster. Normally I can take about 8 hours to build one. I think I only took 5 - 6 hours this time.
After this, there are still five v2.0 Zaku's, 1 v2.0 Gouf (based on the Zaku 2.0 frame), a 1/100 and 1/144 MS06F2 that are waiting to be built. Still need to get a Geara Zulu, which is very Zaku-ish. I do declare that I have a serious case of Zaku-Zaku-mania. I suppose it is better (and probably cheaper) than alcohol addiction.
Fishing pictures up
Too long to be a tweet - the Fishing Gallery is up. Only half a dozen photos at the moment, but they are some of the better (non blurry) ones. Next up, I'll throw in some of the boring pre-production photos.
Wednesday, March 3, 2010
"Fishing"
As is probably apparent with my ramblings so far on this blog, I like robots. Indeed. But I also like whimsical things. So where possible, I combine them. The result was a diorama of a 1:100 scale Master Grade Zaku II v2.0 (the very same one in the first photo of the last blog entry) with a fishing rod. Yes, a Zaku-sized fishing rod.
A Brief Brief
If the question buzzing through your head at the moment is: "Why?", then my answer would be "Why not?"
The title of this diorama is "Fishing". I know, a rather dull title, but it works. This was entered into competitions at my local Japanese toy hobby store (Hobby One) and to a competition in Japan with the Hobby Japan monthly magazine. I must thank Yoshi, who runs Hobby One, who assisted with my entry submission and also a fellow competitor.
I didn't win either of the two, but that's fine as I only entered for fun and basically for the learning experience. It was a blast.
It humbles me to admit that the competition was fierce - there are tons of great modellers out there. If you manage to pick up a copy of the February 2010 issue of Hobby Japan, you can find my entry misspelled "Fvishing" amongst the many non-winning runner-up entries. Unfortunately the photo selected was not one of the better shots to use in a thumbnail. Alas, can't complain! It's exciting enough for a novice like myself to have been selected amongst the runner ups.
On the photo
Today I'm presenting one of the photos I was able to amass for this project. I'm no great photographer, but this is arguably one the better images in the collection, and also an accident. The best received amongst all those I've shown it to, at least.
This accident I am referring to is a visual illusion that extends the diorama beyond its boundaries.
Observe the near portion of the river. The uneven surface of the clear resin (done by prodding the surface with a brush while it was setting) combined with the reflection of natural sunlight results in the illusion of foam on the surface. This makes it look like there are currents in the water.
Next observe the lake and the bank on the far side. These don't exist. Or rather, they do exist, but they're not part of the diorama. The diorama ends where the water changes from light to dark.
Observe the horizontal bar of light close to the far bank. That's really a clear strip of plastic that I used to contain the river. If you look at the part of the photo closest to you, you'll see the other strip of clear PVC sheet containing the other side of the river and bank. Notice how that part of the photo looks like a 3d cutaway of the river.
One thing I like about this photo is how the sun and shade play off the Zaku, the fishing rod and the terrain. Though silhouetted (and thus masking all the details), the lighting results are almost artistic.
The overall picture works very well to viewers that glance at it for the first time. If you inspect it too much, or if you've been reading my comments here, you'll discover that it's just an illusion.
If you squint your eyes, you'll probably even see the tiny pilot that's by the Zaku's right shoulder shield. Just under the diamond shaped light reflecting off the shield. Don't worry if you do not - the pilot's not the focus of the photo.
When I get a chance, I'll put up higher-res version of all the better photos on my Photobucket account.
Monday, March 1, 2010
An uninformed ramble on the Zaku II
Today's mindless rambling is about the mono eyed beast known as the Zaku. More specifically it is the Zaku II. Please note that as per the title, I know very little of the source material not having watched the original series the Zaku originates from. Most of what I know I've gathered in bits and pieces from various sources so please take everything I say in here with a grain of salt. Corrections obviously welcome for those that are better versed in the history and origins of the Zaku II. As a semi-related preamble to this: The real purpose I'm bringing this up is because I just plain like this mecha. However, the other reason is that I had a diorama project I was working on mid to late last year mentioned in last years blogs, but didn't really elaborate on it too much. This was partly due to the fact I had put it into two model making competitions, one local and one in Japan (purely for fun, I assure you!), so wasn't at liberty to disclose too much of the details. Now that the competitions are over - and naturally I did not win (though did end up amongst the many great honourable mentions ) - I will be putting up some photos of the results in the near future. As the key figure in this diorama is a Zaku II, I thought I'd give a brief overview of what it is, from my uninformed perspective. Right, enough o that. What is a Zaku II? Well, this chap in the photo below is a Zaku II - taken from a few snaps I took a few years back called "Zaku II On the Lawn".
To those that know what these guys are and want more specific details on the Zaku in the photo, this is a MS-06F Zaku II. That probably doesn't mean much to most folks. The MS-06 is the model numbering system that Zeon (the side that uses these mobile suits) assign to their various mobile suits. The F marks this as as a variation of the MS-06 with modifications that allow it to be used in space. A MS-06J for example would be the ground type that doesn't have the extra rocket boosters on the legs and backpack. There are many-many other variations. The Zaku II is a type of mobile suit in the Gundam universe. The best way I could describe them is that they look a bit like an American footballer with spikes on one shoulder pad and a shield replacing the other.
Like a large majority of the mobile suits that feature in this series, its sequels and its spinoffs, they have a single camere "eye" on the head (main camera). Zakus are the mass produced staple mobile suits used by the Principality of Zeon (the alleged 'bad guys') against the Earth Federation Space Forces (the alleged 'good guys'). They technically exist solely to be blown up in very large quantities by the EFSF. They are the counterpart to the GM (pronounced Jim) used by the EFSF, which in turn is blown up in large quantities by Zeon. It's interesting to point out that the name Zaku closely resembles the Japanese word Zoku, which can be interpreted as vulgar or common. That technically describes them quite well. I think a better term was Zako - but I can't seem to find the translation in my dictionary - or maybe my imagination made up the word.
These guys first featured in the 1979 anime Mobile Suit Gundam, and I understand were designed by Kunio Kawara, one of the mecha designers for the show. Despite being the blow-me-up-now mecha for the show, they turned out to be more popular than the titular mecha for the series, the Gundam. The plastic model kits for the Zaku outsold the Gundam at a ratio of 2 to 1!
They were originally sold in the standard mass produced green colour and the Char's custom Zaku II which is essentially a red repaint that came with a command antennae on the head.
As the years have gone by and the Gundam mythos continues to expand, many variations of the Zaku have emerged. And I'm speaking of the Zaku II alone, and not the other Mobile Suits that appear to be Zaku spinoffs like the Marasai in Zeta Gundam and the Geara Doga in Char's Counterattack and the Zaku's featured in Seed Destiny. The Zaku, is in a way, the basis for many later mobile suits. (The white Zaku in the photo is an unpainted "White Ogre", a personalized Zaku II from the Igloo 2 series. Note the antennae on the head. That generally signifies that the Zaku II is used by a commanding officer and the whole suit is calibrated to be something like 20% better than the normal suits piloted by the soldiers.)
If you were to ask my why the Zaku did better - I wouldn't have a clue except that I am just as hopelessly fascinated with them. The Zaku is actually quite simple looking monster and is not as intricate in overall detail as the Gundam. There are more curves than straight lines on the limbs, torso and head. Perhaps it's the simplicity of it that assists much of the Zaku's appeal. In a way, for the model kits, this simplicity lends itself greatly to easy customization of the paint work or for etching your own details in.
One aspect of the Zaku that may put mecha fans off is the fact that they are asymmetrical thanks to the shoulder armour consisting of one round pad (with spikes) on the left arm and a shield on the right arm. I quite like the asymmetry - but I do agree that it's a matter of taste. But if you think about it, these are only bits of protective armour. From a model kit perspective, there's always the option of buying two kits and swapping the shoulder pads.
According to the specs of these mobile suits that you get on the instructions for the model kits, Zakus can weigh up to 80 tonnes when fully kitted with their basic equipment (including 100mm machine gun, a 280mm bazooka and an axe known as heat hawk). If you can imagine the amount of weight these guys are swinging about and the amount of momentum they can possibly achieve with that much weight, it's mind boggling. Heavy metal indeed! 'tis a shame they're made to blow up so easily.
Since the start, Zaku model kits have been released and re-released in various sizes such as 1:144, 1:100 and 1:60, and come in various grades classified as High Grade (HG), Master Grade (MG), Perfect Grade (PG) and numerous other types including assembled action figures and other fun items. The recent Master Grade 1:100 scale Zaku II v2.0 releases (from 2006 onwards) are quite breathtaking model kits that are very intricate kits to put together with probably about 5 - 8 hours of construction time depending on how much effort you put in.
Once done, they are excellent to fiddle with and pose thanks to their highly articulate frames as well as offering a feature present in many master grade kits with removable armour plates that let you view the inner mechanical details.
I'll simply close this article off with a personal recommendation by saying that even if you don't plan to immerse yourself in the Gundam universe but would like a fun mecha model kit to put together, definitely give this chap a try. I highly recommend any one of the v2.0 master grade kits - they're well worth it and oodles of fun. However don't limit yourself to the Zaku II - they're just the focus of this blog article. I can heartily recommend the Master Grade 1:100 Gundam Mk II v2.0 kit (either in the AEUG or Titans colour schemes) as well if you'd like to try a Gundam instead, which features equally good articulation and features an interesting sliding armour system to facilitate the articulation without the armour getting in the way. If you don't have any local shops that sell these kits, you can try places like ebay or online shops like Hobbylink Japan.
To those that know what these guys are and want more specific details on the Zaku in the photo, this is a MS-06F Zaku II. That probably doesn't mean much to most folks. The MS-06 is the model numbering system that Zeon (the side that uses these mobile suits) assign to their various mobile suits. The F marks this as as a variation of the MS-06 with modifications that allow it to be used in space. A MS-06J for example would be the ground type that doesn't have the extra rocket boosters on the legs and backpack. There are many-many other variations. The Zaku II is a type of mobile suit in the Gundam universe. The best way I could describe them is that they look a bit like an American footballer with spikes on one shoulder pad and a shield replacing the other.
Like a large majority of the mobile suits that feature in this series, its sequels and its spinoffs, they have a single camere "eye" on the head (main camera). Zakus are the mass produced staple mobile suits used by the Principality of Zeon (the alleged 'bad guys') against the Earth Federation Space Forces (the alleged 'good guys'). They technically exist solely to be blown up in very large quantities by the EFSF. They are the counterpart to the GM (pronounced Jim) used by the EFSF, which in turn is blown up in large quantities by Zeon. It's interesting to point out that the name Zaku closely resembles the Japanese word Zoku, which can be interpreted as vulgar or common. That technically describes them quite well. I think a better term was Zako - but I can't seem to find the translation in my dictionary - or maybe my imagination made up the word.
These guys first featured in the 1979 anime Mobile Suit Gundam, and I understand were designed by Kunio Kawara, one of the mecha designers for the show. Despite being the blow-me-up-now mecha for the show, they turned out to be more popular than the titular mecha for the series, the Gundam. The plastic model kits for the Zaku outsold the Gundam at a ratio of 2 to 1!
They were originally sold in the standard mass produced green colour and the Char's custom Zaku II which is essentially a red repaint that came with a command antennae on the head.As the years have gone by and the Gundam mythos continues to expand, many variations of the Zaku have emerged. And I'm speaking of the Zaku II alone, and not the other Mobile Suits that appear to be Zaku spinoffs like the Marasai in Zeta Gundam and the Geara Doga in Char's Counterattack and the Zaku's featured in Seed Destiny. The Zaku, is in a way, the basis for many later mobile suits. (The white Zaku in the photo is an unpainted "White Ogre", a personalized Zaku II from the Igloo 2 series. Note the antennae on the head. That generally signifies that the Zaku II is used by a commanding officer and the whole suit is calibrated to be something like 20% better than the normal suits piloted by the soldiers.)
If you were to ask my why the Zaku did better - I wouldn't have a clue except that I am just as hopelessly fascinated with them. The Zaku is actually quite simple looking monster and is not as intricate in overall detail as the Gundam. There are more curves than straight lines on the limbs, torso and head. Perhaps it's the simplicity of it that assists much of the Zaku's appeal. In a way, for the model kits, this simplicity lends itself greatly to easy customization of the paint work or for etching your own details in.
One aspect of the Zaku that may put mecha fans off is the fact that they are asymmetrical thanks to the shoulder armour consisting of one round pad (with spikes) on the left arm and a shield on the right arm. I quite like the asymmetry - but I do agree that it's a matter of taste. But if you think about it, these are only bits of protective armour. From a model kit perspective, there's always the option of buying two kits and swapping the shoulder pads.
According to the specs of these mobile suits that you get on the instructions for the model kits, Zakus can weigh up to 80 tonnes when fully kitted with their basic equipment (including 100mm machine gun, a 280mm bazooka and an axe known as heat hawk). If you can imagine the amount of weight these guys are swinging about and the amount of momentum they can possibly achieve with that much weight, it's mind boggling. Heavy metal indeed! 'tis a shame they're made to blow up so easily.

Since the start, Zaku model kits have been released and re-released in various sizes such as 1:144, 1:100 and 1:60, and come in various grades classified as High Grade (HG), Master Grade (MG), Perfect Grade (PG) and numerous other types including assembled action figures and other fun items. The recent Master Grade 1:100 scale Zaku II v2.0 releases (from 2006 onwards) are quite breathtaking model kits that are very intricate kits to put together with probably about 5 - 8 hours of construction time depending on how much effort you put in.
Once done, they are excellent to fiddle with and pose thanks to their highly articulate frames as well as offering a feature present in many master grade kits with removable armour plates that let you view the inner mechanical details.
I'll simply close this article off with a personal recommendation by saying that even if you don't plan to immerse yourself in the Gundam universe but would like a fun mecha model kit to put together, definitely give this chap a try. I highly recommend any one of the v2.0 master grade kits - they're well worth it and oodles of fun. However don't limit yourself to the Zaku II - they're just the focus of this blog article. I can heartily recommend the Master Grade 1:100 Gundam Mk II v2.0 kit (either in the AEUG or Titans colour schemes) as well if you'd like to try a Gundam instead, which features equally good articulation and features an interesting sliding armour system to facilitate the articulation without the armour getting in the way. If you don't have any local shops that sell these kits, you can try places like ebay or online shops like Hobbylink Japan.
Friday, January 2, 2009
The Colouful and Wide World of Paints
Over the last year, I've been experimenting with airbrushing since acquiring a cheap second hand Tamiya Sprayworks air compressor and spray gun set that had only been used once before. It's a wonderful device but requires that you constantly clean the spray gun after using it lest the paint dries and clogs up in it. Still, the even coats with the excellent finish are well worth all the effort to keep the sophisticated device clean.
Now we come to the core of my ramble: Paint.
Ah, paint! A modeler's bread and butter for customising or making their models and other toys look more accurate. To weather or make their model look fresh off the assembly line.
But it's also not necessarily the easiest aspect of building your toy. The type of paint you use is important. There are many types, and the two most common are enamel and acrylic. Oil and water based paints respectively.
To be honest with you, I absolutely enjoy using acrylic. They're easy to work with and cleaning up so easy. Fixing errors, which usually involve stripping all the paint off, is also a breeze. Acrylic thinner and the bulk methylated spirits I use to clean my brushes and the spray gun are less pungent than the enamel thinner and turpentine that enamel paints need.
However, enamel paints are well established and I must admit that they can look very good when done right. They are unfortunately (or should I say fortunately?) hard to strip off if you need to redo a coat. I've been experimenting with them lately and I've found that they work differently from acrylics. In fact, you are absolutely required to start with light colours and work down to the darks. This also means you have to prime your model in a light base colour before you start, and once you do start working with the paint, you'll need several coats to get an even opaque colour. It is possible I might be using too much thinner! I try to keep it 50%/50%, or sometimes 55% paint and 45% thinner if the coats look too watery.
In addition to the two types of paint, paints can be further divided into gloss, metallic and flat.
Gloss paint has a higher resin content in the paint that results in a shiny reflective surface that you can almost see your face in. Glossy paint almost doesn't need a clear coat to seal it in, but one would certainly be recommended. Glossy surfaces are also the best surface for applying decals on.
Metallic paint is very similar to gloss but have metallic flakes in it that render the metalic finish. Metals differ a little and I often find they rub off very easily - which is probably why some paints recommend that you burnish the finish with a cloth when you are done to get rid of the excess. I feel they almost definitely need a clear coat to seal the paint in. Good old chrome silver, gold or copper are great base coats if you are planing to use a semi clear colour coat.
Flat paints are just flat basic colours that aren't reflective once the paint has dried. Flats are probably the easiest to work with as you can tell when they are dry by the dull finish. If you recoat the paint, it will go down glossy so you can tell which parts you have or have not gone over. But that's not the end of it, if later decide that you wanted it to be glossy, all you need to do is coat it with a clear gloss coat spray. Not only will that protect the coat, it'll make it glossy.
In addition to the types of paint you are working with, I've learned that the make of paint is just as important. Paint from different manufacturers will behave differently - particularly with their drying times.
I've tried Humbrol and Tamiya enamel paints. Both are well fairly well established and widely used brands worldwide (at least that's the impression I get after reading some recent modeler magazines). There are most certainly other brands out there, but these are the two most accessible to me.
Humbrol has a decent range of pre-mixed colours. I mean, I needed metallic pink for a particular robot model, and they had it. Fantastic! However, Humbrol paint take a very long time to dry and cure. It almost requires that I wait overnight before I can start working again. Even then, the heat off my fingers tend to leave marks in the finish - though I suspect I may have put on too heavy a coat. For someone as impatient as me, this does not gel very well. I won't knock it off as a bad brand. Far from it! Modelers have used it successfully for years. And I suppose if I was working on something that doesn't need a lot of attention, such as the shell of a vehicle, then perhaps it's not a bad choice. I do however find the paint to be really sticky if they get on the fingers. The stickiness however is quite handy. See, I normally mount the subjects I wanted painted on a piece of cardboard or a stick with some sticky tack or a roll of tape. This makes handling them while painting rather a simple process. Over-spray will definitely get on these. While I'm waiting for the paint to dry, I can touch the over-spray to check whether the paint is dry or otherwise. It'll feel sticky until it is dry.
I started with Humbrol, but found that they were harder to work with than acrylic. Then I discovered Tamiya enamels and found them very easy to use and suited my needs better with their faster drying times. I can start with the next coat or start putting on different colours in almost half an hour to an hour after painting. While you can get all sorts of mixes with Humbrol, Tamiya on the other hand have a very limited selection of pre-mixed enamel paint (not counting their spray paints).
Due to my impatience, my preference is currently leaning heavily towards Tamiya enamels. Part of the reason for my impatience is that I'm working with an airbrush. I can empty the paint into a jar and store it while waiting for my work to dry. But then I'd have to completely clean the spray gun so that any paint inside it won't clog the mechanism. This is a tedious process - and having been a bit lax at one time, I ended up clogging it.
But that's just me. No matter what type of paint I use or the manufacturer, a paint job will always look stunning if it's done right. A good dose of patience helps too. I certainly need to learn that!
The post I made with the Char's Custom Zaku II ver 2.0 painted Santa colours was one of my better recent efforts with enamels.
Sunday, December 28, 2008
A T34/76 Russian Tank model kit
Over the month of December, I spent a few weekends putting together this smart kit from Tamiya:
T34/86 Russian Tank Model
1941(Cast Turret)
1:48 Scale
I'll never say a bad word about military modellers ever again! Not that I've ever said anything bad about them in the first place, but...
Building these and building robot kits like Gundams are like two different worlds. Both are challenging but for different reasons.
Tank kits are relatively simpler than a robot kit. Less moving parts for one, and almost no polycaps. A polycap is a soft PVC part used to simulate joints and are often used in a ball joint setups. No, the wheels and tracks do not move. The turret can swing and aim the gun up and down though!
A tank will generally consist of the chassis, the top, the turret and the wheels/tracks. That's simple enough. That builds the core of the tank. Then there's the detailing like spades, jerry cans, fuel tanks, ammo boxes, chains, lights, handrails, other details and so on and so forth. These require tweezers and good eyesight.
I chose a 1:48 scale model because it's one of the larger models you can build (there are larger and more expensive kits like 1:35 scale), but alas even then the detail elements are so small that even tweezers weren't much help.
One thing I like about a lot of these elements is that a number of them like the spades, pickaxes, tent rolls, and various liquid cans are optional details that you can heap onto the kit any in way you like. You can use as much or as little as you want.
There are two other things that set these sort of military kits apart:
Kotobukiya haven't released any Armored Cores with tank legs as of yet (nor the reverse joints or hover legs), so I just had to give it a go. Works okay, but a tad on the small side. May have to try it again with a much larger kit, and with a more centralized turret. An Abrams might work.
I'll never say a bad word about military modellers ever again! Not that I've ever said anything bad about them in the first place, but...
Building these and building robot kits like Gundams are like two different worlds. Both are challenging but for different reasons.
Tank kits are relatively simpler than a robot kit. Less moving parts for one, and almost no polycaps. A polycap is a soft PVC part used to simulate joints and are often used in a ball joint setups. No, the wheels and tracks do not move. The turret can swing and aim the gun up and down though!
A tank will generally consist of the chassis, the top, the turret and the wheels/tracks. That's simple enough. That builds the core of the tank. Then there's the detailing like spades, jerry cans, fuel tanks, ammo boxes, chains, lights, handrails, other details and so on and so forth. These require tweezers and good eyesight.
I chose a 1:48 scale model because it's one of the larger models you can build (there are larger and more expensive kits like 1:35 scale), but alas even then the detail elements are so small that even tweezers weren't much help.
One thing I like about a lot of these elements is that a number of them like the spades, pickaxes, tent rolls, and various liquid cans are optional details that you can heap onto the kit any in way you like. You can use as much or as little as you want.
There are two other things that set these sort of military kits apart:
- They are usually not coloured Even then, most robot model kits don't come with all the parts moulded in the right colours, and will require some paint to achieve accuracy (unless you're going for a custom build.
- Glue/Cement MUST be used to fix everything together Most modern robot or sci-fi kits have been built for snap-together construction and the use of cement is often optional. (Though lately I find myself using it even with snap-together kits - it makes them hold together so much better)
Kotobukiya haven't released any Armored Cores with tank legs as of yet (nor the reverse joints or hover legs), so I just had to give it a go. Works okay, but a tad on the small side. May have to try it again with a much larger kit, and with a more centralized turret. An Abrams might work.
Tuesday, December 16, 2008
Latest Model Kit Built: AC Dualface
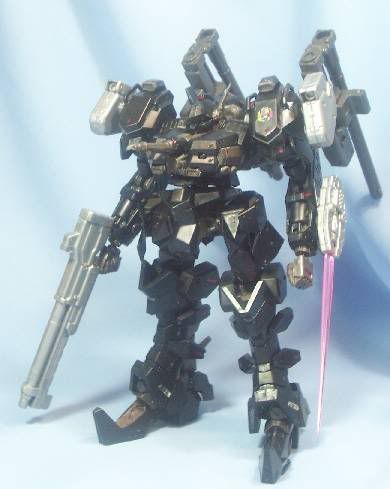
This past weekend I spent most of it building my latest purchase, the Armored Core Crest CR-C90U3 Dual Face (Nexus Version).
For those unfamiliar with the name convention, Armored Core is the series name. Crest is the 'manufacturer' of the CR-C90U3 Core unit. The core is the torso of an Armored Core (AC) that pretty much holds everything together.
I've added a surplus beam saber from a Gundam kit to the laser blade on the left arm. Since I already own the same blade from an optional weapons kit I got separately, I decided to modify this one into an in-action prop for blading display purposes. Unfortunately these arms don't have the articulation to put it in a good blading action pose.
As always, Kotobukiya astound me with the level of detail they manage to pack into their Armored Core model kits. The Dualface is no exception. Naturally it meant just piecing the various limbs together took me several hours - each.
The Dualface is based off a sort-of mid-boss that features in the Armored Core Nexus game for the PS2. It shows up in a lot of the in-game cinematics, and is also the same one that ends up slamming into a building in the second battle that's spliced into the intro movie. For those that are more familiar with Armored Core Last Raven: this AC shows up in that game under the name Pinchbeck, but is piloted by someone else entirely.
This 'Nexus' Version is a special edition that renders the model in colours that are much closer to the game version, which basically means most of the silver bits are now black. It has lots of pre-painted red highlights and the Dual Face logo is printed on one of the shoulders. The photo doesn't do it any justice and certainly looks much nicer in person.
I may just consider getting the standard edition to butcher for parts for a custom AC. If anyone's considering to buy and build an Armored Core kit, I would highly suggest getting something else to start with. Probably the Crest CR-C75U2 (the medium-weight from the Armored Core 3 intro). It shares the arms, head and the grenade launcher that the Dualface uses, but the rest of the parts are probably a bit easier to put together.
Coincidentally, I was listening to a collection of KISS songs while building this, and have suddenly become a bit of a fan of them.
Wednesday, December 10, 2008
A Matter of Building (tiny) Giant Robots
Like a child with a new toy, this blogging business has given me this sense of great power at my finger tips to do practically anything. I feel like I can create worlds, move oceans, rewrite history, talk about cheese. So I had to bash out something to post just for the heck of it. Goodbye my sweet beautiful evening - you had so much unfulfilled potential - then I had to go and this and write three pages about a fairly recent hobby I've picked up. Mind any errors - it was late and I didn't have time to proofread.
Building model kits has been a recent hobby of mine for the last 2 or 3 years. Oh certainly I'd built a few simple ones when I was 11 or 12, but I haven't seriously started building them until just now.
As I've stated elsewhere, I love giant super robots. On the one hand they are war machines made primarily to fight and kill. But let's ignore all that - I don't enjoy them because of that. On the other hand, there's just something about robots that I enjoy. There's a certain artistic beauty to their impossible mechanical designs. But let's not delve into that - we're here about my obsession venture into the world of building scale model kits.
When we think robot model kits, Bandai's extremely popular line of Gundam models often comes to mind. Now, I know little of the series they come from, but I like the robots. I didn't think I'd really get into them as they looked like too much effort for something that got you less than what you put in. I mean, the kits cost just as much if not more than ordinary toys that can be bought complete and ready to play right off the shelf. In addition to that, the preparation and the cost of preparing them certainly add to the bill too for both money, effort and time. In the end, what you get is just a statue with some moving parts. A very delicate statue at that. Something you have to gingerly manipulate in case it breaks from rough usage. And boy can they break easily! Luckily, though I do manipulate the toys every so often, I mainly buy toys to look at and display rather than for actual play. There are many ways to enjoy toys, and that is how I've chosen to enjoy them.
So yes, I thought I'd pick one up and give it a go. It was amazingly hard to put together, and I broke lots of bits in the process. But in the end it still looked great. I put a few of the foil stickers on and was generally happy. I wasn't intending to get another, so thought the whole ordeal was over.
Or was I?
While browsing my local auction site, I saw a large kit from Bandai for a 1:35 scale Mastergrade Ingram 03 from the Patlabor series. Again, a series I know very little about, but I like the mecha designs. So I got it.
At this point I should note that I was blissfully unaware of the varying complexities of Bandai's model kits. Their kits are separate into various complexity levels such as First Grade, High Grade to Master Grade, etc. The higher the grade, the more complex the more elaborate the model is constructed. Obviously this also equate to more work! A Master Grade is roughly a highly detailed model that generally requires someone with moderate to expert level plastic model kit experience. Something I did not have at the time.
So I built the Ingram. Stuff broke, things didn't go right. It took a long time and I almost went cross-eyed when I lost track of time while putting it together. Good lighting is essential! In the end another very nifty model was constructed. Sure I was still a beginner, so there were sprue (parts tree) stubs everywhere, parts weren't aligned properly and it's unpainted, bits were broken and I'd damaged some display gimmick parts on account of not reading the instructions properly. However, I felt a sense of satisfaction for completing it.
As with the other kit, I was quite pleased at how you could bend the arms or twist the legs and put it into various poses for display. The articulation was more elaborate than any old action figure that you can buy of the shelf.
Later on, I picked up another Gundam kit and built that. This time I started taking more care to detail it. I started painting some detail in with a fine brush. That added to the frustration, but the overall look of the finished item looked great.
A year ago, I discovered a brand new hobby shop called Hobby One run by some fine Japanese gentlemen that specialized in Japanese toys. Need I say what this resulted in? A very empty wallet, I can assure you.
Slowly I started buying more and more kits - I've lost count. For now I was shying away from the Master Grade Bandai kits for a time since they were proving to be a bit too complex for me.
Each time, I started to improve my construction technique. The best ever thing I did was to buy a proper set of side cutters. These were Tamiya branded side cutters, and boy was this the biggest and best investment I ever put into this hobby. The parts that were cuts from the parts tree came off with much cleaner cuts. Not perfect, but much better than what I was able to do before. By now I'd started using a sharp X-Acto hobby knife to cut down the sprue stumps. Once or twice I tried to use sandpaper as well, but never really got into the habit of it.
Then I progressed onto detailing the kits with more paint than before. Probably the simplest was to use a fine point technical pen to ink in the panel lines. I don't do this much in general, but it's quite a nice way to bring out detail that would otherwise be hidden. Generally accomplished with what's known as a black wash as well.
Then I started working on the Master Grade kits again. I think about the third or fourth one in, I got to work on the Master Grade 1:100 MS-06J Zaku Ver 2.0 (a whole new mould from a previous kit). I just fell in love with this kit. The articulation for a Gundam kit was breathtaking. Complex, certainly, but I was getting better. I weathered it a little with paint and did something that was quite new to me at the time. I gave it a clear gloss coat.
Several MG kits later, I picked up on Kotobukiya's line of robot kits featuring the 1:72 renditions of the mechs from the Armored Core series of computer games. Their construction was simpler, but the amazing detail that went into the designs had me working with tweezers just to fit parts on. I eventually got into the habit of using plastic cement or glue just to put bits together. But that added another tool in my toolbox to work with.
Several more Bandai and Kotobukiya kits later, I started airbrushing some of my models. I managed to pick up a second hand Tamiya Spray Works basic air compressor and air gun. I rarely used it, but it's amazing what you can do with it. Again, more money thrown into this rather expensive hobby. Oh and the paints. And thinner. Oh my!
I started delving into building dioramas. Thanks to Woodland's Scenics scene elements, I've managed to build a few simple but oddly effective countryside scenes (3 as of typing this). Though I find I rarely pose my builds in them, except for the occasional photo shot. I also picked up a copy of Degenki Hobby's special edition magazine on Zaku 2.0 models. Man was I blown away by the piece called Flak - North America 0079 by Toriwa Toriyama featuring a diorama of blasted wreck of a building with two MG Zaku 2.0 models done up in WW2 styled German tank decor. Simply amazing - I had to do something like that too. And I did, albeit much simpler.
During this time I picked up a copy of Fine Scale Modeler from the library. It was an issue for beginner modellers. Quite a fascinating read - and some of the techniques were well worth adding to my repertoire of knowledge. One thing definite was that I've started using floor wax to coat clear parts. Odd, but strangely useful.
More recently, while building the Armored Core CR-C75U2 Delta Version (Scylla's AC in Armored Core 3) - I started sanding. It's amazing what sanding can do to smooth out the stubs. They're still visible, but you can't feel them anymore. A marked improvement - so I've started sanding for every of my builds after this. This has unfortunately almost doubled my construction time. What used to take me 4 - 5 hours, now takes me up to 8. That's not counting setting up my tools and the cleanup afterwards!
About two months ago, I entered a few of my works into a competition held by Hobby One. There were two stages to the voting, the shop voting and the Auckland Armageddon 08 expo voting. I didn't enter to win - I just did it for fun (and I admit - to show off the diorama I spent ages to put together). Sure enough, I didn't win, but I was surprised that I got 3rd in the store voting and 2nd place for the Armageddon voting. A lot better than I'd hoped - but hey. I got a lovely Zaku folder out of it, so it was no loss. No loss at all!
I think I've come a long way (and spent a lot of money) since I first started. And you know what? I might just keep going. It's an odd hobby that takes up a lot of time simply to draw out the small sense of satisfaction of having built something yourself the way you want to build it. The funniest part of it all is probably the fact I still consider myself a beginner.
Maybe I'll write about this all over again - but for now, good day to you.
Subscribe to:
Posts (Atom)